If you enjoy kitesurfing, making high jumps in moderate to strong wind, you definitely want to try kitesnowboarding. Kitesnowboarding is identical to kitesurfing especially if you use bidirectional board in kitesurfing. The difference is that you are likely to enjoy kitesnowboarding all by yourself on a snowy field or a frozen lake, there is nobody there to tell you not to jump high or to go fast and you don't have to wait 1/2 hour for the ski lift nor having to pay for it.
Kitesnowboarding is a bit harder than kiteskiing but much easier than kitesurfing so if you live in a colder climate and want to get into kitesurfing, don't wait until spring, go kitesnowboarding now! The skill you learn in kitesnowboarding is identical to kitesurfing.
Many people has a misconception that it is cold kitesnowboarding. On the contrary, I have found that kitesnowboarding is "warmer" than any other winter sports and much warmer than kitesurfing in spring and fall (and most of the summer too!).
The Equipment
To go kitesnowboarding you need the following equipment:
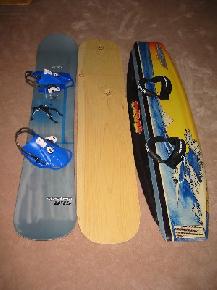
1. A traction kite, lines and associated control device. Any land or water kite can be used for kitesnowboarding. Use inflatable kites with care as they can get damaged by crashing on ice (also pumping an inflatable in -20C is not easy). Similar to kitesurfing, make sure you have a safety release system that you can depower the kite at any moment. Furthermore, you may want to use a kite that provides some depowering capability such that you don't have to stop and change to a smaller or larger kite as frequent. Similar to kitesurfing, you would need a number of kites to cover the whole wind range. A snowboard (any standard snowboard would do). If you want to go fast, select a a long, narrow snowboard. If you want to jump and doing tricks, select a short, wide snowboard. You need to reposition the bindings to be as centered as possible with 6 to 24 degrees duck stance (as in the picture above). Also, as you lean mostly backward, position the high back of the binding to make leaning backward comfortable.A pair snowboard boots (step-in snowboard boots are the most convenience; however, regular boots and strap bindings may be slightly lighter).A windsurfing harness (waist or seat harness is fine).A helmet (a must on ice or hard pack as you don't want to test the "rigidity" of your skull when it hits the ice). If you do a lot of jumping on hard pack or ice, protect your body with a wakeboard impact vest with elbow and knee pads or simply use the same protection equipment that a hockey player uses.Warm clothing. You normally need less warm clothing kitesnowboarding than snowboarding. It's best to use layers such that you can take off some layers when it gets too warm.A good pair of thin yet warm mitten. Don't use glove as your fingers can get cold rapidly.
So how big a kite you need for kitesnowboarding? If you can edge properly, you should use the same kite size as for kitesurfing. Use a smaller kite (around 3/4 of the kite size for kitesurfing) only if you cannot edge properly (ice, almost ice or some bare spots of ice)
The Place
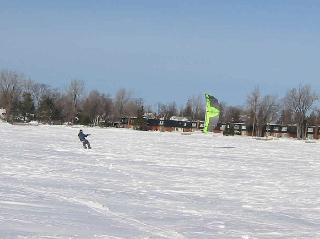
The best place to kitesnowboard is probably a very large snowy field with clean wind (the minimum is twice the size of a football or soccer field). The second best place is a frozen lake with snow on top. If you kitesnowboard on a lake, just make sure you have checked the ice condition. In early or late season, the ice condition may be conditional, so it's wise to stay close to shore in the shallow area (maximum knee or waist deep). One of the advantage of kitesnowboarding is such that you can stay close to shore without having the risk of destroying your fins or board.
Normally, the ice is considered safe for any human activities such as walking or kitesnowboarding if it is around 10 cm or 4" deep. To check the ice thickness, just take an axe and dig a hole in the ice until you reach the water. The other more obvious sign of safe ice is snowmobile, car tracks or fishing huts on ice. These vehicles need ice thicker (from 6" to 1') than kitesnowboarding.
Even though you can kitesnowboard on ice, it is more desirable if you have some decent snow coverage (as long as you can edge properly). 1" of snow fused into the ice is good enough for cruising and 2-3" of snow is good enough for jumping.
As the pull of the kite is slightly lighter than kitesurfing, going upwind on a snowboard is easy. One of the main bonus of kitesnowboarding is that it's OK to kitesnowboard in off-shore wind. If worse come to worse you can simply depower the kite, pack it and walk back to shore (as long as you have checked the ice condition)
The Technique
Before starting to learn kitesnowboarding, it is recommended that you already have some experience flying a traction kite. If you have never flown a traction kite, please review the Kite piloting and the Kite power controlling sections before proceeding.
It is also recommended to review the whole HowTo section of kitesurfing as the techniques used in kitesurfing (a bidirectional board) and kitesnowboarding is identical.
How To Start?
Foils:
Lay your kite on the ground and put enough snow on its trailing edge to keep it in place. Click here to see a picture.Release the lines from you control bar or handles and attach your safety leash to your wrist or harness. Click here to see a picture.If you use a closed-cell foil that has pre-inflation valves (such as the New Wave or JoJo Wet), open them now to pre-inflate the kite (close the valve after the kite is 1/2 to 3/4 inflated)..Get your boots in your snowboard binding.Launch the kite (if you are on ice, use the edge of your snowboard to stop yourself from getting dragged downwind). If you are using a closed cell foil, make sure you maintain the tension on the front lines to let the wind fill the kite for approximately 60 seconds before launching. Click here to see a picture.Dive the kite in the direction where you want to go. You may have to point your snowboard down wind or in a broad reach direction first and then turn upwind once you have gather enough speed.
Inflatables:
Put the kite down on snow, leading edge toward the wind, one tip of the kite is on the sand the other tip is in the air. The kite looks like a vertical "C" with the leading edge facing the wind. Fold the kite tip and put enough snow on it to keep it from moving around.If you are not using step-in binding, get in you binding now.Hold the control bar and position yourself such that kite is at the wind window edge respective to your position (the kite is either 85 degrees to the left or the right of you with its leading edge facing the wind).If you use a 4 line inflatable, adjust your trim strap to put the kite in a depowered mode.Attach the safety leash to your wrist or harness. Don't hook in or shackle in to your kite until after you have launched you kite.Pull on the control bar and the line nearest to the ground to unfold the tip and release the kite from the sand.Pull the top line (the line farthest from the ground) to move the kite up.Step in your binding if you have not done so in step 3.Adjust the trim strap to power up your kite (and shackle in if you normally ride shackled in).Dive the kite in the direction where you want to go. You may have to point your snowboard down wind or in a broad reach direction first and then turn upwind once you have gather enough speed.
How To Get Going?
Similar to kitesurfing, if you have enough power to get going, simply lock your kite at 30 - 60 degrees in the forward moving direction.If you don't have enough power, move your kite in a sine wave pattern to get going.To turn the snowboard upwind, edge harder and put more pressure on the tail/back of the snowboardTo turn the snowboard downwind, flatten the snowboard
It's best to keep a wide stance between your feet for maximum stability at speed.
As opposed to downhill snowboarding where you keep most of the pressure on your front foot, in kitesnowboarding, you should keep even pressure between your feet for more balance and control.
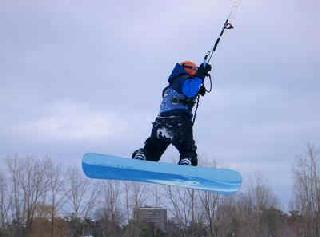
Photo by Claude
In lots of powder snow, you need straighten your front foot and bend your back foot to let the front tip of the snowboard float above the surface to go easier and faster.
How To Jibe?
With a snowboard, you don't need to jibe, just move the kite up, stop and then move the kite in the backward direction to move backward. You can perform a more "glamorous" jibe by simply jumping and then landing moving in the other direction (only do this once you have learned how to land smoothly as hard packed snow and ice are not very forgiving). The other option is to perform a fake jibe as when jibing a bidirectional board: move the kite up and carve the board downwind; when the kite is almost a zenith, edge the windward rail and slide the board down wind; the back foot now become the new front foot; dive the kite is the new direction to get going (also read the Jibing a bidirectional board section of kitesurfing).
How To Jump?
Jumping in kitesnowboarding is identical to jumping in kitesurfing. You can either jump with the help of a "ramp" or jumping with the help of your kite. Jumping with a ramp is very easy in kitesnowboarding. Jumping using the kite is a bit harder as you may have slightly less power from the kite than in kitesurfing in less snow condition; however, the faster speed on snowboard provides the needed line tension to jump even with less power from the kite.
If you want to jump high in kitesnowboarding, you should only do that in powder snow as ice and hard packed snow are not very forgiving.
Jumping in kitesnowboarding uses identical techniques as in kitesurfing. Read the Jumping section for more information.
How To Land?
Landing smoothly is somewhat optional in kitesurfing (especially when you are learning new tricks); however, it is a must in kitesnowboarding unless you want to break your bones. Read the Landing section for the technique of smooth landing in kitesnowboarding and kitesurfing.
Kitesnowboarding is a bit harder than kiteskiing but much easier than kitesurfing so if you live in a colder climate and want to get into kitesurfing, don't wait until spring, go kitesnowboarding now! The skill you learn in kitesnowboarding is identical to kitesurfing.
Many people has a misconception that it is cold kitesnowboarding. On the contrary, I have found that kitesnowboarding is "warmer" than any other winter sports and much warmer than kitesurfing in spring and fall (and most of the summer too!).
The Equipment
To go kitesnowboarding you need the following equipment:
1. A traction kite, lines and associated control device. Any land or water kite can be used for kitesnowboarding. Use inflatable kites with care as they can get damaged by crashing on ice (also pumping an inflatable in -20C is not easy). Similar to kitesurfing, make sure you have a safety release system that you can depower the kite at any moment. Furthermore, you may want to use a kite that provides some depowering capability such that you don't have to stop and change to a smaller or larger kite as frequent. Similar to kitesurfing, you would need a number of kites to cover the whole wind range. A snowboard (any standard snowboard would do). If you want to go fast, select a a long, narrow snowboard. If you want to jump and doing tricks, select a short, wide snowboard. You need to reposition the bindings to be as centered as possible with 6 to 24 degrees duck stance (as in the picture above). Also, as you lean mostly backward, position the high back of the binding to make leaning backward comfortable.A pair snowboard boots (step-in snowboard boots are the most convenience; however, regular boots and strap bindings may be slightly lighter).A windsurfing harness (waist or seat harness is fine).A helmet (a must on ice or hard pack as you don't want to test the "rigidity" of your skull when it hits the ice). If you do a lot of jumping on hard pack or ice, protect your body with a wakeboard impact vest with elbow and knee pads or simply use the same protection equipment that a hockey player uses.Warm clothing. You normally need less warm clothing kitesnowboarding than snowboarding. It's best to use layers such that you can take off some layers when it gets too warm.A good pair of thin yet warm mitten. Don't use glove as your fingers can get cold rapidly.
So how big a kite you need for kitesnowboarding? If you can edge properly, you should use the same kite size as for kitesurfing. Use a smaller kite (around 3/4 of the kite size for kitesurfing) only if you cannot edge properly (ice, almost ice or some bare spots of ice)
The Place
The best place to kitesnowboard is probably a very large snowy field with clean wind (the minimum is twice the size of a football or soccer field). The second best place is a frozen lake with snow on top. If you kitesnowboard on a lake, just make sure you have checked the ice condition. In early or late season, the ice condition may be conditional, so it's wise to stay close to shore in the shallow area (maximum knee or waist deep). One of the advantage of kitesnowboarding is such that you can stay close to shore without having the risk of destroying your fins or board.
Normally, the ice is considered safe for any human activities such as walking or kitesnowboarding if it is around 10 cm or 4" deep. To check the ice thickness, just take an axe and dig a hole in the ice until you reach the water. The other more obvious sign of safe ice is snowmobile, car tracks or fishing huts on ice. These vehicles need ice thicker (from 6" to 1') than kitesnowboarding.
Even though you can kitesnowboard on ice, it is more desirable if you have some decent snow coverage (as long as you can edge properly). 1" of snow fused into the ice is good enough for cruising and 2-3" of snow is good enough for jumping.
As the pull of the kite is slightly lighter than kitesurfing, going upwind on a snowboard is easy. One of the main bonus of kitesnowboarding is that it's OK to kitesnowboard in off-shore wind. If worse come to worse you can simply depower the kite, pack it and walk back to shore (as long as you have checked the ice condition)
The Technique
Before starting to learn kitesnowboarding, it is recommended that you already have some experience flying a traction kite. If you have never flown a traction kite, please review the Kite piloting and the Kite power controlling sections before proceeding.
It is also recommended to review the whole HowTo section of kitesurfing as the techniques used in kitesurfing (a bidirectional board) and kitesnowboarding is identical.
How To Start?
Foils:
Lay your kite on the ground and put enough snow on its trailing edge to keep it in place. Click here to see a picture.Release the lines from you control bar or handles and attach your safety leash to your wrist or harness. Click here to see a picture.If you use a closed-cell foil that has pre-inflation valves (such as the New Wave or JoJo Wet), open them now to pre-inflate the kite (close the valve after the kite is 1/2 to 3/4 inflated)..Get your boots in your snowboard binding.Launch the kite (if you are on ice, use the edge of your snowboard to stop yourself from getting dragged downwind). If you are using a closed cell foil, make sure you maintain the tension on the front lines to let the wind fill the kite for approximately 60 seconds before launching. Click here to see a picture.Dive the kite in the direction where you want to go. You may have to point your snowboard down wind or in a broad reach direction first and then turn upwind once you have gather enough speed.
Inflatables:
Put the kite down on snow, leading edge toward the wind, one tip of the kite is on the sand the other tip is in the air. The kite looks like a vertical "C" with the leading edge facing the wind. Fold the kite tip and put enough snow on it to keep it from moving around.If you are not using step-in binding, get in you binding now.Hold the control bar and position yourself such that kite is at the wind window edge respective to your position (the kite is either 85 degrees to the left or the right of you with its leading edge facing the wind).If you use a 4 line inflatable, adjust your trim strap to put the kite in a depowered mode.Attach the safety leash to your wrist or harness. Don't hook in or shackle in to your kite until after you have launched you kite.Pull on the control bar and the line nearest to the ground to unfold the tip and release the kite from the sand.Pull the top line (the line farthest from the ground) to move the kite up.Step in your binding if you have not done so in step 3.Adjust the trim strap to power up your kite (and shackle in if you normally ride shackled in).Dive the kite in the direction where you want to go. You may have to point your snowboard down wind or in a broad reach direction first and then turn upwind once you have gather enough speed.
How To Get Going?
Similar to kitesurfing, if you have enough power to get going, simply lock your kite at 30 - 60 degrees in the forward moving direction.If you don't have enough power, move your kite in a sine wave pattern to get going.To turn the snowboard upwind, edge harder and put more pressure on the tail/back of the snowboardTo turn the snowboard downwind, flatten the snowboard
It's best to keep a wide stance between your feet for maximum stability at speed.
As opposed to downhill snowboarding where you keep most of the pressure on your front foot, in kitesnowboarding, you should keep even pressure between your feet for more balance and control.
Photo by Claude
In lots of powder snow, you need straighten your front foot and bend your back foot to let the front tip of the snowboard float above the surface to go easier and faster.
How To Jibe?
With a snowboard, you don't need to jibe, just move the kite up, stop and then move the kite in the backward direction to move backward. You can perform a more "glamorous" jibe by simply jumping and then landing moving in the other direction (only do this once you have learned how to land smoothly as hard packed snow and ice are not very forgiving). The other option is to perform a fake jibe as when jibing a bidirectional board: move the kite up and carve the board downwind; when the kite is almost a zenith, edge the windward rail and slide the board down wind; the back foot now become the new front foot; dive the kite is the new direction to get going (also read the Jibing a bidirectional board section of kitesurfing).
How To Jump?
Jumping in kitesnowboarding is identical to jumping in kitesurfing. You can either jump with the help of a "ramp" or jumping with the help of your kite. Jumping with a ramp is very easy in kitesnowboarding. Jumping using the kite is a bit harder as you may have slightly less power from the kite than in kitesurfing in less snow condition; however, the faster speed on snowboard provides the needed line tension to jump even with less power from the kite.
If you want to jump high in kitesnowboarding, you should only do that in powder snow as ice and hard packed snow are not very forgiving.
Jumping in kitesnowboarding uses identical techniques as in kitesurfing. Read the Jumping section for more information.
How To Land?
Landing smoothly is somewhat optional in kitesurfing (especially when you are learning new tricks); however, it is a must in kitesnowboarding unless you want to break your bones. Read the Landing section for the technique of smooth landing in kitesnowboarding and kitesurfing.
|
Some of our content may be related to gambling.   |